Investigating .NET Core
In this month’s Essential .NET column, I continue my investigation into the various features of .NET Core, this time with a fully released version (no longer in beta or a euphemistic release candidate). Specifically, I’m going to focus on its command-line utilities (which are found within the .NET Core Common library at github.com/aspnet/Common) and how to leverage them for parsing a command line. I confess I’m particularly excited to finally see command-line parsing support built into .NET Core as it’s something I’ve wished for since the .NET Framework 1.0. I’m hoping that a .NET Core built-in library might help standardize, even if only a little, the command-line format/structure between programs. It isn’t so important to me what the standard is as much as there be a convention that people default to, rather than everyone creating their own.
A Command-Line Convention
The bulk of the command-line functionality is found within the Microsoft.Extensions.CommandLineUtils NuGet package. Included in the assembly is a CommandLineApplication class that provides command-line parsing with support for short and long names for options, values (one or more) assigned with either a colon or an equals sign, and symbols like -? for help. Speaking of help, the class includes support for displaying the help text automatically. Figure 1 shows some sample command lines that would be supported.
Figure 1. Sample Command Lines
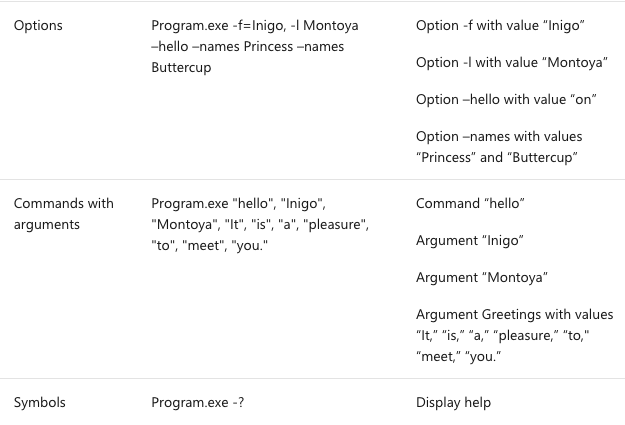
As described next, there are multiple argument types, one of which is called an “Argument.” The overloading of the term argument to refer to the values specified on the command line versus the command-line configuration data can lead to significant ambiguity. Therefore, for the remainder of the article, I’ll distinguish between a generic argument of any kind—specified after the executable name—and the argument type called “Argument” (title case) by the casing. Similarly, I’ll distinguish the other argument types, Option and Command, using title case rather than the lowercase terms that generically refer to the argument. Please take note of this as it will be important throughout the remainder of the article.
Each of the argument types is described as follows:
- Options: Options are identified with a name, where the name is prefixed with either a single (-) or double dash (–). Option names are programmatically defined using templates and a template can include one or more of the following three designators: short name, long name, symbol. In addition, an Option might have a value associated with it. For example, a template might be “-n | –name | -#
,” allowing the full name option to be identified by any of the three designators. (However, the template doesn’t need all three designators.) Note that it’s the use of a single or double dash that determines whether a short or long name is specified, regardless of the actual length of the name. To associate a value with an option, you can use either a space or the assignment operator (=). -f=Inigo and -l Montoya, therefore, are both examples of specifying an option value. If numbers are used in the template, they’ll be part of the short or long names, not the symbol. - Arguments: Arguments are identified by the order in which they appear rather than by a name. Thus, a value on the command line that isn’t prefixed by an option name is an argument. Which argument the value corresponds to is based on the order in which it appears (Options and Commands are excluded in the count).
- Commands: Commands provide a grouping of arguments and options. For example, you can have a command name “hello” followed by a combination of Arguments and Options (or even sub-Commands). Commands are identified by a configured keyword, the command name, that groups all the values following the command name to be part of that Command’s definition.
Configuring the Command Line
Programming the command line after referencing the .NET Core Microsoft.Extensions.CommandLineUtils begins with the CommandLineApplication class. With this class you’re able to configure each Command, Option and Argument. When instantiating the CommandLineApplication, the constructor has an optional Boolean value that configures the command line to throw an exception (the default) if an argument appears that hasn’t been specifically configured.
Given an instance of the CommandLineApplication, you configure arguments using the Option, Argument, and Command methods. Imagine, for example, you want to support a command-line syntax as follows, where items in square brackets are optional and those in angle brackets are user-specified values or arguments:
Program.exe <-g|--greeting|-$ <greeting>> [name <fullname>]
     [-?|-h|--help] [-u|--uppercase]
Figure 2 configures the basic parsing capability.
Figure 2. Configuring the Command Line
public static void Main(params string[] args)
{
    // Program.exe <-g|--greeting|-$ <greeting>> [name <fullname>]
    // [-?|-h|--help] [-u|--uppercase]
  CommandLineApplication commandLineApplication =
    new CommandLineApplication(throwOnUnexpectedArg: false);
  CommandArgument names = null;
  commandLineApplication.Command("name",
    (target) =>
      names = target.Argument(
        "fullname",
        "Enter the full name of the person to be greeted.",
        multipleValues: true));
  CommandOption greeting = commandLineApplication.Option(
    "-$|-g |--greeting <greeting>",
    "The greeting to display. The greeting supports"
    + " a format string where {fullname} will be "
    + "substituted with the full name.",
    CommandOptionType.SingleValue);
  CommandOption uppercase = commandLineApplication.Option(
    "-u | --uppercase", "Display the greeting in uppercase.",
    CommandOptionType.NoValue);
  commandLineApplication.HelpOption("-? | -h | --help");
  commandLineApplication.OnExecute(() =>
  {
    if (greeting.HasValue())
    {
      Greet(greeting.Value(), names.Values, uppercase.HasValue());
    }
    return 0;
  });
  commandLineApplication.Execute(args);
}
private static void Greet(
  string greeting, IEnumerable<string> values, bool useUppercase)
{
  Console.WriteLine(greeting);
}
It Starts with CommandLineApplication
To begin, I instantiate the CommandLineApplication, specifying whether the command-line parsing will be strict—throwOnUnexpectedArg is true—or relaxed. If I specify to throw an exception when an argument is unexpected, all arguments will have to be explicitly configured. Alternatively, if throwOnUnexpectedArg is false, then any arguments that aren’t recognized by the configuration will be stored into the CommandLineApplication.RemainingArguments field.
Configuring a Command and Its Argument
The next step in Figure 2 is configuring the “name” Command. The keyword that will identify the command within a list of arguments is the first parameter of the Command function—name. The second parameter is an Action
Notice in configuring the names Argument I specifically identify that it will support multipleValues. In so doing, I allow more than one value to be specified—multiple names in this case. Each of these values appears following the “name” argument identifier until another argument or option identifier appears. The first two parameters of the Argument function are name, referring to the Argument’s name so you can identify it from a list of Arguments, and description.
One last thing to point out in the name Command configuration is the fact that you need to save the return from the Argument function (and the Option function if there’s any). This is necessary so you can later retrieve the arguments associated with the names Argument. Without saving a reference, you end up having to search through the commandLineApplication.Commands[0].Arguments collection in order to retrieve the Argument data.
One elegant way to save all the command-line data is to place it into a separate class that’s decorated with the attributes from theASP.NET Scaffolding repo (github.com/aspnet/Scaffolding), specifically the src/Microsoft.VisualStudio.Web.CodeGeneration.Core/CommandLine folder.
Configuring an Option
The next argument configured in Figure 2 is the greeting Option, which is of type CommandOption. Configuration of an Option is done via the Option function, where the first parameter is a string parameter called template. Notice that you can specify three different names (for example, -$, -g, and -greeting) for the option and each of these will be used to identify the option from the list of arguments. Also, a template can optionally specify a value associated with it by means of an angle-bracketed name following the option identifiers. After the description parameter, the Option function includes a required CommandOptionType parameter. This option identifies:
- Whether any value may be specified after the option identifier. If a CommandOptionType of NoValue is specified, then the CommandOption.Value function will be set to “on” if the option appears within the list of arguments. The value “on” is returned even if a different value is specified following the option identifier and, in fact, whether a value is specified. To see an example, review the uppercase option in Figure 2.
- Alternatively, if the CommandOptionType is SingleValue and the option identifier is specified but no value appears, a CommandParsingException will be thrown identifying the option was not identified—because it didn’t match the template. In other words, SingleValue provides a means of checking that the value is provided, assuming the option identifier appears at all.
- Last, you can provide a CommandOptionType of MultipleValue. Unlike the multiple values associated with a command, however, multiple values in the case of an option allow the same option to be specified multiple times. For example, program.exe -name Inigo -name Montoya.
Notice that none of the configuration options will configure so the option is required. And, in fact, the same is true for an argument. To error out if a value isn’t specified, you need to check whether the HasValue function reports an error if it returns false. In the case of a CommandArgument, the Value property will return null if no value is specified. To report the error, consider displaying an error message followed by the help text so users have more information about what they need to do to correct the problem.
Another important behavior of the CommandLineApplication parsing mechanism is that it’s case-sensitive. And, in fact, at this time there’s no easy configuration option that allows you to make it case-insensitive. Therefore, you’ll need to change the case of the actual arguments passed into the CommandLineApplication (via the Execute method, as I’ll describe shortly) beforehand to achieve case insensitivity. (Alternatively, you could try submitting a pull request at github.com/aspnet/Common to enable this option.)
Display Help and Version
Built into the CommandLineApplication is a ShowHelp function that displays the help text associated with the command-line configuration automatically. For example, Figure 3 shows the ShowHelp output for Figure 2.
Figure 3. ShowHelp Display Output
Usage:  [options] [command]
Options:
  -$|-g |--greeting <greeting>  The greeting to display.
                                The greeting supports a format string
                                where {fullname} will be substituted
                                with the full name.
  -u | --uppercase              Display the greeting in uppercase.
  -? | -h | --help              Show help information
Commands:
  name
Use " [command] --help" for more information about a command.
Unfortunately, the help displayed doesn’t identify whether an option or command is, in fact, optional. In other words, the help text assumes and displays (via square brackets) that all options and commands are optional.
Although you can call ShowHelp explicitly, for example when handling a custom command-line error, it will be automatically invoked whenever an argument matching the HelpOption template is specified. And, the HelpOption template is specified via an argument to the CommandLineApplication.HelpOption method.
Similarly, there’s a ShowVersion method for displaying the version of your application. Like ShowHelp, it’s configured via one of two methods:
public CommandOption VersionOption(
  string template, string shortFormVersion, string longFormVersion = null).
public CommandOption VersionOption(
  string template, Func<string> shortFormVersionGetter,
  Func<string> longFormVersionGetter = null)
Notice that both methods require the version information you wish to display to be specified in the call to VerisionOption.
Parsing and Reading the Command-Line Data
So far I’ve reviewed in detail how to configure the CommandLineApplication, but I haven’t yet discussed the ever-so-critical process of triggering command-line parsing, or what will happen immediately following the parse invocation.
To trigger command-line parsing you need to invoke the CommandLineApplication.Execute function and pass the list of arguments specified on the command line. In Figure 1, the arguments are specified in the args parameter of Main so they’re passed into the Execute function directly (remember to first handle casing if case sensitivity isn’t desirable). It’s the Execute method that sets the command-line data associated with each Argument and Option that’s configured.
Note that CommandLineAppliction includes an OnExecute(Func
Note also that the int returned from the invoke delegate is designed as a means of specifying a return value from Main. And, in fact, whatever value is returned from invoke will correspond to the return from Execute. Moreover, because parsing is considered a relatively slow operation (I suppose it’s all relative), Execute supports an overload that takes a Func<task
Guidelines: Commands, Arguments and Options
Given the three command types available, it’s worth quickly reviewing which to use when.
Do use Commands when semantically identifying an action such as compile, import or backup.
Do use Options to enable configuration information to either the program as a whole or a specific command.
Favor a verb for the name of a command and an adjective or noun for the name of an option (such as -color, -parallel, -projectname).
Regardless of which argument type you configure, consider the following guidelines:
Do review the case of argument identifier names. It could be very confusing for a user who specifies -FullName or -fullname when the command line is looking for a different case.
Do write tests for the command-line parsing. Methods like Execute and OnExecute make this relatively easy to do.
Do use Arguments when identifying particular arguments by name is cumbersome or when multiple values are allowed but prefixing each one with an option identifier is unwieldy.
Consider leveraging IntelliTect.AssertConsole for redirecting console input and output in order to inject and capture the console so it can be tested.
There’s one possible drawback to using the .NET Core CommandLineUtils and that’s that they’re English-based and not localized. Display text such as that found in ShowHelp (along with exception messages that generally aren’t localized) are all in English. Normally, this might not be a problem but because a command line is part of an application’s interface with the user, there are likely to be scenarios where English-only is unacceptable. For this reason:
Consider writing custom functions for ShowHelp and ShowHint if localization is important.
Do check CommandLineApplication.RemainingArguments when the CommandLineApplication is configured to not throw exceptions (throwOnUnexpectedArg = false).
Wrapping Up
Over the last three years the .NET Framework has gone through some major transitions:
- It now has cross-platform support, including support for iOS, Android and Linux — Wow!!
- It has migrated from a secret, proprietary approach toward development to an entirely open — as in open source — module.
- There has been a significant refactoring of the BCL APIs for the .NET Standard Library into a highly modular (cross) platform that can be leveraged over the vast range of application types out there, whether Software as a Service, mobile, on-premises, Internet of Things, desktop and more.
- There has been a rebirth of .NET, following the Windows 8 era where it was ignored with very little strategy or roadmap of note.
All that’s to say, if you haven’t yet started to dive into the new .NET Core 1.0, now is a great time to do so, giving you the longest time span in which to amortize the learning curve. In other words, if you’re contemplating upgrading to it from earlier versions, do so now. Chances are good you’ll be upgrading at some point, and the sooner you do, the sooner you can take advantage of its new features.
Thanks to the following IntelliTect technical experts for reviewing this article: Phil Spokas.
This article was originally posted here in the September 2016 issue of MSDN Magazine.
</task