
Azure DevOps NuGets
Successfully manage version numbers and CI/CD pipelines with this tutorial on how to publish NuGets with Azure DevOps.
Azure DevOps is an amazing platform for managing the software development lifecycle. For those of us who live in the .NET world, this often means producing and distributing libraries as NuGet packages. There are already many tutorials that cover the basics of how to do this. If you need to, check those out then come back to learn how to publish NuGets with Azure DevOps.
In Azure DevOps there are two types of pipelines – Build pipelines, and Release pipelines.

Note: If you have the Multi-stage pipelines preview feature turned on then these will display as “Pipelines (Build) and Release”.

It is important to understand that the build pipeline is responsible for compiling your code, running tests, and eventually producing a NuGet package. The release pipeline is responsible for taking that NuGet package and pushing it out to various hosting providers such as nuget.org.
As a practical example, we will look at the pipelines used by the IntelliTect.Analyzers NuGet package. The source code for this project is available on GitHub.
Setting Up the Build Pipeline
Setting up a build pipeline is generally simple and straightforward. Azure DevOps has several pre-built templates to get started quickly. If this is your first time creating a build pipeline, I recommend you take a look through this tutorial. The most common way to define a build pipeline is with a YAML file. Such as this one:
trigger:
- master

pool:
  vmImage: 'windows-latest'

steps:
- script: echo Hello, world!
  displayName: 'Run a one-line script'
The code snippets in the steps below, represent individual tasks that will be placed under the steps: section. For now, we are going to look at the individual steps in the build pipeline. You may want to adjust these to suit your needs.
Install NuGet CLI
The first task in our build pipeline will need to install the latest NuGet command line utility. The following code will download and install the NuGet CLI. It is worth mentioning if you don’t specify a version for the task, you may get an older version of the NuGet CLI. At the time of writing, the latest version is 5.4.0. In most cases you will want to use the latest release.
- task: NuGetToolInstaller@0
  displayName: 'Use latest NuGet'
  inputs:
    versionSpec: '5.4.0'
Restore All NuGet Packages
The next task will restore all NuGet packages in the solution. This task may not be required if you restore NuGet dependencies as part of your build.
- task: NuGetCommand@2
  displayName: 'NuGet Restore'
  inputs:
    command: 'restore'
    restoreSolution: '**/*.sln'
    feedsToUse: 'select'
Compile the Code, and Run All Unit Tests
The following tasks are responsible for making sure that the code compiles and all of the tests pass. Notice that the configuration and version are set from variables. We’ll come back to these when we get to versioning.
- task: VSBuild@1
  displayName: 'Build'
  inputs:
    solution: '**/*.sln'
    clean: true
    configuration: $(BuildConfiguration)
    msbuildArgs: '/p:Version=$(version)'

- task: DotNetCoreCLI@2
  displayName: 'Test'
  inputs:
    command: 'test'
    projects: '**/*.Tests.csproj'
Create the NuGet Package
Now that the code compiles and the tests pass, we can begin the process of packaging up the code into a NuGet package. There are several ways to create a NuGet package, but one of the simplest options is to use the dotnet pack command. Note that we create the NuGet package with the “-ci-$(Build.BuildId)” suffix. We’ll cover the reason for this in the versioning and publishing sections below.
- task: PowerShell@2
  displayName: 'dotnet pack'
  inputs:
    targetType: 'inline'
    script: dotnet pack -p:Version="$(version)-ci-$(Build.BuildId)" -o $(Build.ArtifactStagingDirectory)
    pwsh: true
Publish the NuGet Package
It is important to note that the build pipeline should not publish the NuGet package to a package repository. “Publish” in this context simply saves the NuGet package as an artifact, or output file, of the build pipeline. It then becomes available for other pipelines to use as an input, as we’ll see in the release pipeline section.
- task: PublishBuildArtifacts@1
  inputs:
    PathtoPublish: '$(Build.ArtifactStagingDirectory)'
    ArtifactName: 'drop'
    publishLocation: 'Container'
Versioning
It is generally best to let the build pipeline help manage the version of your package. It is already configured to consistently increment the build ID and provides a single source to manage versions. Many NuGet packages follow semantic versioning (semver), which can be helpful in determining how to set your version numbers. NuGet packages also support the idea of pre-release packages. To create a pre-release package, append a suffix to the version number. This suffix typically includes a build number to ensure that the version created is unique. Some common suffixes are “-ci”, “-alpha”, or “-beta”. It is also important to note that the version of the library that we provided in the compilation task does not contain this suffix.
In the dotnet pack command we added earlier, we created the pre-release NuGet package using a suffix of “-ci-(Build.BuildId)” appended to the version number. Using the build ID as a suffix ensures that each build creates a unique NuGet package. The base version number is stored in a variable at the top of the build pipeline configuration YAML file. Storing the base version in this way makes the version number part of source control; alternatively, you can create it as a pipeline variable in the library within a variable group if you would prefer to have this data live outside of source control.
variables:
  version: '0.1.6'
You can see the completed pipeline on the IntelliTect GitHub.
Setup the Release Pipeline
The release is composed of stages, where each stage distributes the NuGet package created by the build pipeline to a NuGet repository. For our purposes, we’ll use two: Azure DevOps Artifacts and NuGet.org. Let’s look at the configuration for each piece.

Artifacts
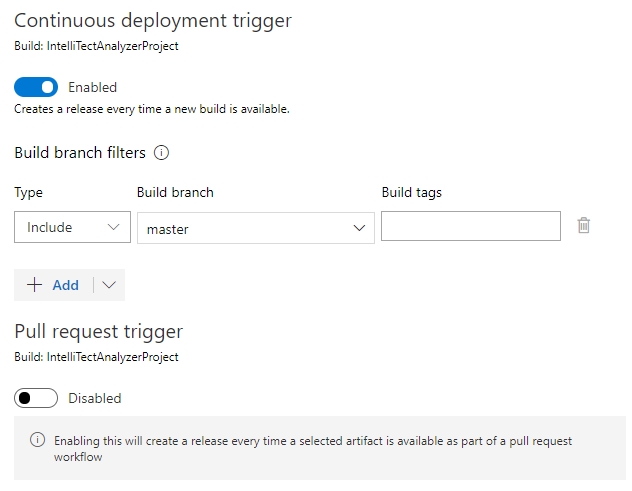
The release pipeline Artifacts are the NuGet package(s) that we created (published) in the build pipeline. The key setting is the Continuous deployment trigger.

It is important to make sure that you are not triggering releases on all builds, as this could accidentally distribute builds created from pull requests. A common setup is to only trigger releases on builds from a particular branch (such as master) and restrict direct access to this branch so changes must go through a code review process.
Azure DevOps Artifacts
The first release stage pushes out the NuGet package to Azure DevOps Artifacts (not to be confused with the artifacts for the release pipeline). This stage has no unique configuration and pushes all releases to a private feed called CI-Release. Pushing prerelease packages to Azure DevOps Artifacts allows you to easily test them before they go out to a public NuGet repository. This can be helpful since NuGet.org can occasionally take some time to index packages and make them available in the public feed.
This stage only has a single job with a single NuGet task that pushes the NuGet package to the feed.

NuGet.org
Now we need to publish our NuGet package to a public feed for others to consume. Because this is a public feed, it is best practice to require manual approval on this stage before allowing it to continue and publish to NuGet.org. To do this, we add a pre-deployment approval condition as pictured below.

Depending on your process you may have several pre-releases published to Azure DevOps Artifacts. Each of these will be queued, pending approval, on the next stage (NuGet.org). To release the latest version, and avoid the need to cancel older releases, set the “Deployment queue settings” option to “Deploy latest and cancel the others”.

Remember that our build process is producing pre-release NuGet packages. Before we publish the NuGet package, we need to change the version number to make a release NuGet package. To do this, we’ll use a dotnet global tool called nupkgwrench (NuGet Package Wrench). This tool has lots of useful commands and utilities for manipulating NuGet packages.
The first step in the deployment stage runs a PowerShell script to install nupkgwrench.
dotnet tool install -g nupkgwrench
The next step converts our NuGet package from a pre-release to a full release by removing the “-ci-” suffix from the version.
nupkgwrench release */.nupkg
Finally, our last step will push the full release package to NuGet.org.

Conclusion
This is a process that I have employed on several projects with great success. I find the simplicity of it makes for a very reliable release workflow. This process also scales out nicely if you have a repository that produces more than one NuGet package.
Several possible changes may be worth considering for your project:
- Add a second stage to the release pipeline with a nightly trigger to push pre-release packages to NuGet.org. I have used this process on the Material Design in Xaml project to automatically trigger nightly releases of preview NuGet packages.
- On the final stage of the release pipeline, also push packages to Azure DevOps Artifacts.
What other improvements would you make for your projects? Let me know in the comments below.
Comments are closed.