
Material Design in XAML
Material Design In XAML (MDIX) is a beautiful theme library that brings Google’s Material Design to your Windows Presentation Framework (WPF) applications. In this tutorial, we look at the XAML Dialog Host, one of its most powerful controls. XAML Dialog Host provides a simple way to display a dialog with information or prompt the user when required.
To begin, this post assumes that you have already set up a project with MDIX. Also, it surmises that you understand the Model-View-ViewModel (MVVM) pattern. Though, the XAML Dialog Host can be used without MVVM as well.
The Anatomy of a DialogHost
We will start with a very simple example.
<Window x:Class="DialogHost.SimpleBlog.MainWindow"
       xmlns="https://schemas.microsoft.com/winfx/2006/xaml/presentation"
       xmlns:x="https://schemas.microsoft.com/winfx/2006/xaml"
       xmlns:d="https://schemas.microsoft.com/expression/blend/2008"
       xmlns:mc="https://schemas.openxmlformats.org/markup-compatibility/2006"
       xmlns:materialDesign="https://materialdesigninxaml.net/winfx/xaml/themes"
       xmlns:local="clr-namespace:DialogHost.SimpleBlog"
       mc:Ignorable="d"
       Title="MainWindow" Height="450" Width="800">
   <Window.DataContext>
       <local:MainWindowViewModel />
   </Window.DataContext>

   <materialDesign:DialogHost CloseOnClickAway="True">
       <materialDesign:DialogHost.DialogContent>
           <Grid Margin="20">
               <TextBlock Text="My first Dialog" />
           </Grid>
       </materialDesign:DialogHost.DialogContent>

       <Button Command="{x:Static materialDesign:DialogHost.OpenDialogCommand}" Content="Show Dialog"
               HorizontalAlignment="Left" VerticalAlignment="Center" Margin="50,0,0,0"/>
   </materialDesign:DialogHost>
</Window>Code language: HTML, XML (xml)
Running application then looks like this:
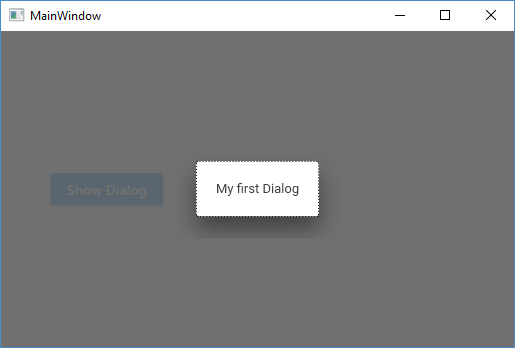
Figure 1: Simple dialog host application.
The DialogHost consists of three individual UI components: the host control, the overlay, and the dialog. The host control contains the content that the dialog should be placed on top of. Typically, this is placed near the root of your XAML so that it covers everything. The overlay is the darkened region that covers all of the content within the host control. Finally, the dialog itself contains the content to display. By default, the dialog shows inside of a popup. Since a popup is a separate window, the dialog can be larger than its parent window. If you want the dialog constrained to its parent window, you can apply the alternate MaterialDesignEmbeddedDialogHost style to the DialogHost.
MaterialDesignEmbeddedDialogHost is new in version 2.5.0 which is currently in beta.

Figure 2: The layers of a DialogHost. 1. The host control wrapping the rest of the content. 2. The overlay. 3. The dialog content.
Showing and Closing a dialog
The DialogHost works well with applications using both MVVM and code-behind architecture. Because of this, there are several ways to show a dialog. You may elect to use any number of these options in your app.
Routed Commands
The DialogHost provides two RoutedCommands for showing and hiding dialogs; OpenDialogCommand and CloseDialogCommand, respectively. This is the simplest pure XAML option as it simply walks up the element tree until it encounters a DialogHost control. Set this as the Command property, and it will show the dialog.
<Button Command="{x:Static materialDesign:DialogHost.OpenDialogCommand}" … />Code language: HTML, XML (xml)Also, if you want to close a dialog, you can use the CloseDialogCommand.
<Button Command="{x:Static materialDesign:DialogHost.CloseDialogCommand}" … />Code language: HTML, XML (xml)IsOpen Property
For simple programmatic control over the state of the dialog, the DialogHost provides an IsOpen property. Toggling the state of this property causes the dialog to show or hide. The IsOpen property can also pair with data binding, making it easy to use in MVVM architecture.
<materialDesign:DialogHost IsOpen="{Binding IsDialogOpen}">
   <materialDesign:DialogHost.DialogContent>
       <TextBlock Text="A simple dialog" Margin="20"/>
   </materialDesign:DialogHost.DialogContent>
   <Button Command="{Binding ShowDialogCommand}" Content="Show Dialog"
                 HorizontalAlignment="Left" VerticalAlignment="Center" Margin="50,0,0,0"/>
</materialDesign:DialogHost>Code language: HTML, XML (xml)
public class MainWindowViewModel : ViewModelBase
{
private bool _IsDialogOpen;
public bool IsDialogOpen
{
get => _IsDialogOpen;
set => Set(ref _IsDialogOpen, value);
}
public ICommand ShowDialogCommand { get; }
public MainWindowViewModel()
{
ShowDialogCommand = new RelayCommand(OnShowDialog);
}
private void OnShowDialog()
{
IsDialogOpen = true;
}
}Or, use code behind:
<materialDesign:DialogHost x:Name="DialogHost">
   <materialDesign:DialogHost.DialogContent>
       <TextBlock Text="A simple dialog" Margin="20"/>
   </materialDesign:DialogHost.DialogContent>
   <Button Click="ShowDialog_OnClick" Content="Show Dialog"
       HorizontalAlignment="Left" VerticalAlignment="Center" Margin="50,0,0,0"/>
</materialDesign:DialogHost>Code language: HTML, XML (xml)
private void ShowDialog_OnClick(object sender, RoutedEventArgs e)
{
DialogHost.IsOpen = true;
}Code language: JavaScript (javascript)CloseOnClickAway Property
To make the dialog close automatically if the user clicks on the overlay, set the CloseOnClickAway property to “True”.
<materialDesign:DialogHost CloseOnClickAway="True">

   ...

</materialDesign:DialogHost>Code language: HTML, XML (xml)
Static DialogHost.Show Method
For even more control over dialogs, there are several static Show methods on the DialogHost class. All of these methods return Tasks and should be used as async methods. The dialog’s content was specified in XAML and then shown or hidden in the previous examples. When using the Show method, you must pass the content for the dialog. This allows for creating dynamic dialogs.
var dialogContent = new TextBlock
{
   Text = "Dynamic Dialog!",
   Margin = new Thickness(20)
};
await MaterialDesignThemes.Wpf.DialogHost.Show(dialogContent);Code language: JavaScript (javascript)
Figure 3: A dynamic dialog
This approach certainly works but requires creating the dialog UI in code. A better approach is to declare the dialog’s UI as a DataTemplate and pass a data object as the dialog’s content.
<materialDesign:DialogHost CloseOnClickAway="True">
   <materialDesign:DialogHost.DialogContentTemplate>
       <DataTemplate DataType="local:Person">
           <StackPanel Margin="20">
               <TextBlock Text="{Binding FirstName}" />
               <TextBlock Text="{Binding LastName}" />
           </StackPanel>
       </DataTemplate>
   </materialDesign:DialogHost.DialogContentTemplate>
</materialDesign:DialogHost>Code language: HTML, XML (xml)
var person = new Person
{
FirstName = "John",
LastName = "Doe"
};
await MaterialDesignThemes.Wpf.DialogHost.Show(person);Code language: JavaScript (javascript)
Figure 4: A dialog created from a DataTemplate
The Show method also includes overloads with callback delegates invoked when the dialog is opened or closed. You can also register for the DialogOpened and DialogClosed events directly on the DialogHost. The event arguments for these callbacks contain a DialogSession object. This session object can update the content of a dialog that has already been shown or close a visible dialog.
await MaterialDesignThemes.Wpf.DialogHost.Show(person,
   new DialogOpenedEventHandler((object sender, DialogOpenedEventArgs args) =>
   {
       DialogSession session = args.Session;
       //Updating the contents of the dialog
       //object newContent = ...;
       //session.UpdateContent(newContent);

       //Closing dialog programmatically. Pass the session object to where it is needed.
       //session.Close();
   }));Code language: JavaScript (javascript)
Finally, there are additional overloads for passing a dialog identifier. If there is only a single DialogHost instance, the Show method will automatically use it. However, in cases with more than one DialogHost instance, you must specify a dialog identifier. This unique id identifies which DialogHost control to use.
<materialDesign:DialogHost Identifier="MyDialogHost">
...
</materialDesign:DialogHost>Code language: HTML, XML (xml)
await MaterialDesignThemes.Wpf.DialogHost.Show(person, "MyDialogHost");Code language: CSS (css)Returning Values
Dialogs shown with the static Show method can also return result values. These result values can be objects that you want.
object result = await MaterialDesignThemes.Wpf.DialogHost.Show(...);
//Handle the resultCode language: JavaScript (javascript)
Depending on how the dialog is closed, there are several ways to specify the return value.
- Option 1: If using the DialogCloseCommand, set the CommandParameter on the same element that is using the command.
- Options 2: If using the CloseOnClickAway, set the CloseOnClickAwayParameter on the DialogHost
- Option 3: If using the DialogSession, pass a parameter to the Close method.
- The IsOpen property does not support passing a result. You must use one of the other methods.
Despite being one of the most powerful control in the MDIX library, the XAML Dialog Host is also one of the most misunderstood. However, it can make working with “modal” dialogs in your application a breeze with a little effort. It can improve both the aesthetics of the user interface and simplify the user experience.
Additional Resources.
- MaterialDesignInXAML documentation.
- Additional examples
At the time of writing, the current release of Material Design in XAML is version 2.4.1
Want More?
Check out my other blog on XAML and make sure to leave any questions in the comments below!

Does Your Organization Need a Custom Solution?
Let’s chat about how we can help you achieve excellence on your next project!
Comments are closed.