
Migrating Microsoft Authenticator on a New Phone or Device
Have you ever gotten a new phone only to remember that you have to transfer your Microsoft Authenticator information to the new device? It turns out that this is a somewhat complex, poorly documented process.
The steps outlined in this blog will work with regular and external accounts in Azure Active Directory where you are a guest.
Stop!
First, ensure you do not give up/wipe/destroy your old device before setting up your new one. Keeping your old device as is makes the process much easier.
If you don’t have your device, don’t despair. If you set up another method for signing in, like a phone number or another email, that can work to get this set up on your new device. It is critical to set up multiple options. However, if you don’t have this, you can reach out to an organization administrator to get access to your account. This is why it is crucial to have more than one administrator; if one loses access, the other can fix the issue.
Migrating Accounts in Microsoft Authenticator
Migrate the accounts in authenticator to the new phone.
- Start Microsoft Authenticator, press on the menu icon, and choose Settings.
- For iOS, make sure that iCloud backup is checked. Note the recovery account and make sure you have access to that account. This backs up the authenticator accounts to iCloud. There is a similar process for Android.
- Make sure the authenticator is installed on the new device.
- On the new device in the startup, it prompts for restoring. Sign in to the recovery account, and the authenticator accounts should appear.
You should now see your accounts in the authenticator. However, some of them will have a large red exclamation point with some red text “Action required.”
Fixing Regular Accounts in Microsoft Authenticator
Here is how to fix the accounts that have “Action required.” See the next section if this is a guest account with an #EXT# in the name.
- On the web, log in to that account. I used https://portal.office.com. You likely need your old device or an MFA method to log in.
- Click on your picture or initials in the upper right and choose “View Account.” You should see something like this:
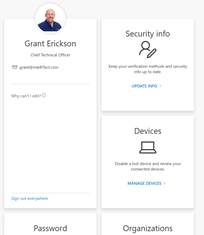
- In the Security info box, click “UPDATE INFO.”
- You may be asked to sign in again.
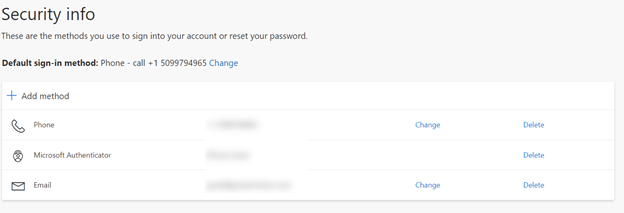
- You will then see a list of authentication methods for that account and organization.
- If you don’t have an alternate method to the authenticator, you may want to add one before the next step.
- You may not see “Add Method.” If so, delete the Authenticator and/or Microsoft Authenticator entries in this list.
- Click “Add Method,” select Authenticator App from the list, and click “Add.” Click “Next” and “Next” again. This should show you a QR code or have an option to display a QR code in a link at the bottom of the information box. Hold right here and move to the next step on your phone.
- On the new device, click on the Action Required item and then on the Action Required list item with the arrow to the right. This prompts for a QR code. Point the device at the QR code.
- If you already deleted the item on your new device, you can click the plus in the upper right corner to add a new account. Choose the account type and then choose the Scan QR code option.
- Back on the browser, complete the process by testing your newly minted authenticator account.
Fixing Guest Accounts in Microsoft Authenticator
One more thing, it is possible to be a guest in an Azure Active Directory. These accounts typically look like name_mydomain.com#EXT#@otherdomain in the authenticator app. This can happen when you are invited to be a guest user in an Azure Active Directory other than your organization’s. Follow these steps to address guest accounts once your primary organization’s multi-factor authentication is set up.
- Go to https://account.activedirectory.windowsazure.com/r/#/profile
- Log in to your organizational account (not the guest one). This should require multi-factor auth from your original account.
- Click on your profile picture or initials in the upper right and choose Switch Organization.
- This presents you with a flyout of organizations your role is a guest. Click the one you want to update the authenticator for.
- You will be asked to authenticate with that guest organization. This is why you need to have your old device or an alternate method of authentication set up, like a phone number or email. If not, you need to contact an organization administrator and have them reset your multi-factor authentication.
- This should take you to a My Apps page which may or may not have anything on it.
- In the upper left, click on your picture or initials and choose View Account.
- Now you can follow the steps in the last section for updating authentication by clicking on the Security info box on the UPDATE INFO link.
Wrapping Up
Yes, this is a tricky process, and Microsoft doesn’t document it well. It appears they changed it sometime in late 2021, and the docs have not been updated.
If you are struggling with Office 365 and Azure security-related issues, our team of experts can help you with best practices to get your organization on firm security footing.
Want More?
Want more information on authentication? Check out Meg’s blog on how to Authenticate Without Code Using AAD and Azure App Services.

Does Your Organization Need a Custom Solution?
Let’s chat about how we can help you achieve excellence on your next project!