
Understanding AAD Authentication and the Advantages of Implementing Role-based Authorization
Authentication can be challenging to set up and maintain. In most cases, it’s not very cost-effective or feasible to set up an authentication service from scratch and actively maintain it. Thankfully, several authentication services (such as Google, Facebook, and Microsoft) are available for developers. This blog discusses Microsoft’s Azure App Service’s Authentication (formerly known as Authentication and Authorization) using Azure Active Directory (AAD).
The “new” Authentication service, often referred to by its codename “Easy Auth,” acts as a gateway in front of your Azure App Service’s site/API. It simply gives you a zero-code solution for authentication for your site/APIs. As its name implies, “Easy Auth” is only for Authentication at this point. It allows for basic authorization in the form of letting you mark whether a page or API requires a user to sign in to access it; however, you can use third-party code to get role-based authorization functioning with it.
Some advantages to using AAD authentication through an Azure App Service Authentication (“Easy Auth”) are that it is easy to set up and simple to maintain. There does not have to be any code involved, and everything is managed through the Azure portal.
As mentioned, it is also possible to implement role-based authorization using Azure App Service easy authentication. However, this requires some code configuration when using .NET Core, as role-based authentication using easy auth is only natively supported for the .NET framework. This is solved using third-party middleware such as MaximRouiller’s easy auth middleware recommended by Microsoft documentation regarding this issue. Another option is Microsoft.Identity.Web package, which was recently updated to support Azure “Easy Auth,” although some additional translation code is required for the claims principal.
We do not cover the implementation of role-based authorization in this blog post, but Johnny Reilly is an excellent resource for getting it working using Microsoft.Identity.Web after you set up Azure “Easy Auth” using the steps below.
Overview and Requirements List
In this guide, we go over the following three topics, with each building off the previous one.
- Authenticating against your Azure App Service
- We discuss how to configure authentication for your Azure App Service and set up Authentication (Azure “Easy Auth”), which requires a user to sign in before accessing your web app.
- Requiring group and user assignment for access
- In this step, we go over assigning users/groups access to your web app to ensure only authorized users/groups have access.
- Authenticating an HTTP request against your web app
- Finally, we discuss how you can request a bearer token from Azure App Services, which can authenticate external code or applications such as Postman to make calls to your web apps API endpoints.
Prerequisites you should have installed or configured:
- Visual Studio Code installed along with ASP.NET and the latest .NET SDK and runtime.
- Azure App Service VS Code Extension
- An Azure tenant
- Azure Active Directory
- Postman
Setup – Creating a Web Application and Publishing It to an App Service
To start, we need to create a web application. For this example, I am using a .NET Core MVC web app, but it does not matter what language or framework you decide to create your web app in as long as you can publish it to an Azure App Service.
Open a PowerShell terminal and type: dotnet new mvc --name AppServiceAuthDemo.

This creates a new web application. To open the web app in Visual Studio Code, type: code -r AppServiceAuthDemo and hit enter.
Now that we have the project open in VS Code let’s run the rest of our .NET commands using the built-in VS Code terminal.
Open the VS Code terminal and ensure you are in the correct project directory before typing the dotnet run command. Your web app is now up and running! You can visit the site by navigating to the localhost URL displayed in the terminal (use ctrl+c to stop the web app).

Now that you have a web application, the next step is to publish it to an Azure App Service. You can follow this documentation for publishing using VS Code or this documentation for steps on publishing using Visual Studio.
Authenticating Against Your Azure App Service
Once you have published your web application to Azure, it is time to add some authentication to it. At this point, you can navigate to the web app from an incognito window without verifying who you are.
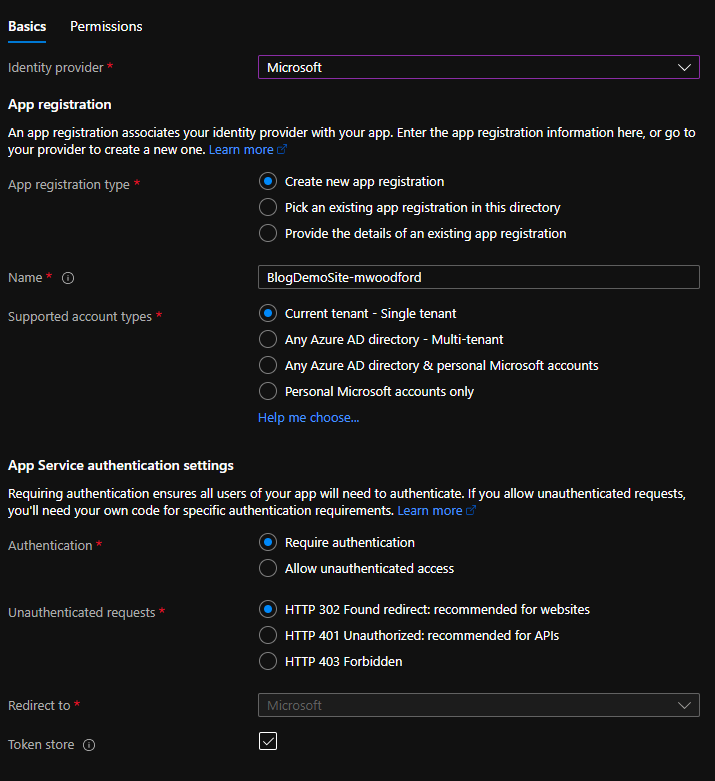
To set up authentication for your App Service, start by navigating to App Service Settings->Authentication (NOT classic) and clicking on ‘Add Identity Provider.’
Select ‘Microsoft’ as your Identity provider from the drop-down. The rest of the settings can remain as default, but it is worthwhile to read through each configuration option to understand what they do. Before clicking ‘Add,’ make sure that Authentication is set to Require authentication. If you set it to Allow unauthenticated access, users won’t be prompted or required to sign in. While you can still authenticate with AAD, the sign-in endpoint auth/login/aad and sign-out endpoint /.auth/logout won’t prompt users to do so when they interact with your application unless you specifically modify your application to redirect to the authentication endpoints. Click ‘Next: Permissions >’ and specify any permissions you may need. For our purposes, you can leave the default permissions as is and click ‘Add.’
Try selecting the site using an incognito browser. This should present you with a permissions consent dialog. You should only see this dialog the first time you log onto your web app (or if you add additional permissions to the web app). All it asks is for you to consent to the permissions granted in the previous step. Click ‘Accept’ and sign in.
Requiring Group and User Assignment for Access
Hooray! You have successfully set up easy auth to your web app! You may be thinking, “well, great, but I don’t want my entire organization having access to this application; how do I restrict access with AAD?” In that case, keep reading as we cover how to restrict access to your web app further.

- In a new tab, navigate to your Azure Active Directory (AAD). On the left-hand side, you should see Enterprise applications and App registrations.
- Click on ‘Enterprise applications.’
- When you set up authentication in your app service, Azure created an app registration, which sets up an enterprise application.
- Find the enterprise application with the same name as your app service.
- Navigate to Manage->Properties.
- Switch the ‘User assignment required?’ option to ‘Yes’ to assign users access to your web app.
- Failing to update the assignment required option assigns any user in the active directory that logs into your web app to this enterprise app. In some cases, this behavior is desirable, but not for our purposes.
- Be sure to save before navigating to Manage->Users and groups.
- You may see yourself already assigned to the enterprise app (explained in step 5a). If so – remove yourself and try navigating to the web app in an incognito browser.
- This prompts you to log in. After logging in, you are presented with a page saying you do not have permission to view that directory or page.
- Navigate back to your enterprise application group assignments in Azure and add yourself back as a valid user.
- Now, try navigating to the web app. You are prompted to log in again, but this time, you should access your web app as an authenticated user.

You have now set up your web app to require explicit assignments via its associated enterprise application.
Authenticating a HTTP Request Against Your Web App
You now have Azure AD group and user authorization set up for users to sign in and access your web app. How do you access your web apps endpoints using something like Postman?
Suppose you would like to access your endpoints with an external application or script. In that case, you need to configure a security principle in Azure that can authenticate against the Azure App Service. There are two kinds of security principles: user principles, which represent active directory users, and service principles, representing an application requiring authorization to a specific Azure resource.
For this part of the guide, we set up a simple get endpoint on your web app we can access using Postman.
To start, open your Visual Studio project and create a new file called DemoController.cs, copy and paste the following code snippet in that file and save (be sure to update your namespace if needed).
using Microsoft.AspNetCore.Mvc;

namespace AppServiceAuthDemo.Controllers
{
    [Route("api/[controller]")]
    [ApiController]
    public class DemoController : ControllerBase
    {
        [HttpGet("SayHello")]
        public ActionResult<string> SayHelloWorld()
        {
            return "Hello World!";
        }
    }
}
Code language: HTML, XML (xml)
Before continuing, double-check that you have added controllers to your Startup.cs. Your startup should contain the following lines of code:
public void ConfigureServices(IServiceCollection services)
{
services.AddRazorPages();
services.AddControllers(); // Required for controllers
}

public void Configure(IApplicationBuilder app, IWebHostEnvironment env)
{
.
.
.

app.UseEndpoints(endpoints =>
{
endpoints.MapRazorPages();
endpoints.MapControllers(); // Required for controllers
});
}
Code language: JavaScript (javascript)
Once you have added all of the above code to your app, start it up on localhost. Let’s configure Postman to send a GET request to the following endpoint /api/demo/sayhello. Since authentication is taken care of on your App Service, you should be able to access this endpoint and see Hello World! when running locally with no problems.

Open Postman and create a new “GET” tab. Configure the request not to use any authentication. Enter your localhost address and the controller’s endpoint and click ‘send.’ You should receive a 200 OK response, as shown below.
Next, re-publish the web app to the Azure App Service using the same steps you took earlier in this guide.
After publishing, navigate to your web app hosted by your app service and navigate to that same GET endpoint using Postman. A 401 Unauthorized response should occur.

So, How Do We Get Authenticated?
We can do this by setting up another app registration to use for authentication. First, we need to add an app role to the existing app registration. Navigate back to Azure Active Directory and open the App Registrations page. Then, search for the App Registration created by the Azure App Service earlier in this demo. The App Registration should have the same name as your App Service (unless you specified a different name upon creation). Once you find the app registration, navigate to Manage -> App Roles. Create a new app role; under Allowed member types, select ‘Applications.’ Make sure the app role is enabled and click ‘Apply.’

Now we need to create a new app registration. Navigate back to ‘App Registrations’ and create a new app registration. Give it an easily identifiable name. I am calling mine AppServiceAuthDemoApp-Client. Navigate to Manage -> API Permissions -> Add a permission -> My APIs -> name of App Service app registration -> Application Permissions. Select the role you just created and click ‘Add permissions.’ Be sure to grant admin consent for the newly added permission.
Requesting an Access Token Using Postman
You are now ready to request an access token using Postman. Open Postman and create a new POST request. Following this, configure your POST request’s body as form data with the following parameters:
client_id:{client ID}
client_secret:{client secret}
grant_type:client_credentials
resource:{Application ID URI}
Send the POST request to the following URL https://login.microsoftonline.com/{tenantID}/oauth2/token
Client ID is the ID of the app registration you just made, so the AppServiceAuthDemoApp-Client app registration in my case.
The client secret is the corresponding secret for that ID (you need to create a client secret under Manage->Certificates & secrets).
The grant type is just the string _clientcredentials
The resource is the Application ID URI of the app registration you just made (e.g., AppServiceAuthDemoApp-Client). You can find this value on the overview page of your app registration. If there is no Application ID URI set, click the ‘Add an Application ID URI’ link and then ‘Set’ next to Application ID URI. Put the URL of your web app there.

Send the Postman request; you should get a bearer access token returned to you. Before we try accessing the sayhello endpoint, we need to do one last thing. Navigate to your Azure App Service -> Settings -> Authentication. Edit the Identity provider you created at the beginning of this guide. Change the ‘Issuer URL’ to be https://login.microsoftonline.com/{tenantID}. Add the Application ID URI from Postman to the ‘Allowed token audiences.’
Click ‘save’ and navigate back to Postman. On your GET request to the sayhello endpoint, under the Authorization tab, select ‘OAuth 2.0 ‘as your authorization type, then copy and paste your access token into the ‘Current Token’ section. Rerun your get request in Postman. You should now be able to access your web app’s endpoint.

That Is That!
For more information on this process, visit the Microsoft documentation. In conclusion, the below diagram should sum up everything you created during this walk-through.

Ready For More?
Curious about related technologies? Check out this video from a past Spokane .NET Users Group meet-up on creating DevContainers! Subscribe to our YouTube channel for more videos.

Does Your Organization Need a Custom Solution?
Let’s chat about how we can help you achieve excellence on your next project!