
How to Use Key Vault as a Configuration Provider
When developing software, just about any serious project you’re working on is multi-environment based with environments such as local, dev, QA, staging, production, etc. More so, just about any serious project you’re working on is going to have sensitive key data such as API keys, database credentials, certificates, tokens, your social security number, your mother’s maiden name, and other data you may want to keep in a slightly more secure spot than a plain text file or even a local secrets file.
It would also be nice to maintain consistency between your different environments. For example, if you’re using Azure Key Vault for storing sensitive data for your production environment, it would be great also to use Azure Key Vault for your local environment. Of course, these should be two separate instances of Key Vault, with permissions configured for their respective environments.
Wouldn’t it also be great to pull Key Vault data into your app and access it just like you would information from your appsettings.json? Let’s talk about how to hook Azure Key Vault into our app configuration and how to authenticate against it when in our different environments.
Using the Options Pattern and Adding Key Vault as a Configuration Provider
To start, create a new ASP.NET Core web project. When writing, .NET 6 is the latest stable version of .NET. You can set up this Azure Key Vault configuration provider in any project that lets you use the Microsoft.Extensions.Configuration package. Outside of a web project, some set-up is required to get it working. I am starting by jumping right into a web application. Configuration and dependency injection (DI) has a much lower set-up bar than other project types.
Using the Options Pattern
Let’s start by creating a section in our appsettings.json that we can set up with the Options pattern. Place the following information in your appsettings.json:
"AdminAccount": {
  "Email": "ExampleAdmin@IntelliTect.com",
  "FirstName": "IntelliTect",
  "LastName": "Admin",
  "Birthday": "01/01/1990"
}Code language: JavaScript (javascript)Email, FirstName, LastName, and Birthday are all reasonable values to store in plain text format for our purposes, but I would like to also store a Password value here, which is sensitive data and should never be stored in the appsettings.json. Ideally, we will end up storing Password in our KeyVault, but let’s start by storing it in the secrets.json for now so we can get some of the project’s scaffolding done. Right-click on your project and click Manage User Secrets.

Add the following to the secrets.json file you just opened:
{
  "AdminAccount": {
    "Password": "SuperSecurePassword123!"
  }
}
Code language: JSON / JSON with Comments (json)
Storing your secrets in the secrets.json helps prevent them from being accidentally checked into a git repo, but they are still being stored as plain text on your machine, which is not ideal. Additionally, you will need to share these credentials with any new developers that join the project, allowing them to store the same credentials on their local machine in plain text. This is not ideal in most cases.
Now that you’ve set up your configuration values, create a new file called AdminAccountOptions.cs that looks like this:
public class AdminAccountOptions
{
    public const string SectionName = "AdminAccount";

    [Required]
    public string? Email { get; set; }

    public string? FirstName { get; set; }

    public string? LastName { get; set; }

    public DateTime Birthday { get; set; }

    [Required]
    public string? Password { get; set; }
}
Code language: JavaScript (javascript)
You’ll notice that some of my properties have a [Required] attribute. The Options pattern allows you to validate configuration values pulled into your AdminAccountOptions class. You may also notice we could define Birthday as DateTime with no additional conversion logic on our part.
Now that you have your Options class, let’s set this up with dependency injection. Head back over to your Program.cs file and add the following code before calling Build():
builder.Services
    .Configure<AdminAccountOptions>(
    builder.Configuration.GetSection("AdminAccount"));
Code language: CSS (css)
Make sure you specify the correct section to pull from in your appsettings.json.
Launching Your Application
Now that we’re set up, let’s use this in our application. If you followed along and set up a Razor Pages application, you should be able to head over to your Index.cshtml.cs file and add the following code. Alternatively, if you set up an MVC project with controllers, you can declare the IOptions<AdminAccountOptions> in the controller’s constructor:
public class IndexModel : PageModel
{
public AdminAccountOptions AdminAccountOptions { get; }
public IndexModel(IOptions<AdminAccountOptions> adminAccountOptions)
{
AdminAccountOptions = adminAccountOptions.Value;
}
public void OnGet()
{
}
}
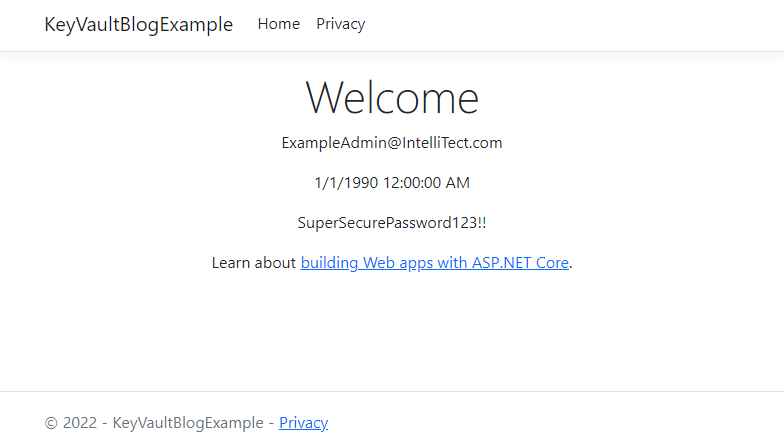
Code language: HTML, XML (xml)Keep in mind that making your AdminAccountOptions property public in a Razor Page makes your Admin Account password openly visible, so you should make this private. However, I want to display the Email, Birthday, and Password in the rendered HTML to prove that we have those values for this tutorial.
On the Index.cshtml file, you can add the following code and then start up your application:
<p>@Model.AdminAccountOptions.Email</p>
<p>@Model.AdminAccountOptions.Birthday</p>
<p>@Model.AdminAccountOptions.Password</p>
Code language: HTML, XML (xml)
Upon launching the app, you should see the above HTML rendered with the email string, birthday date, and password string you specified in the appsettings.json and secrets.json.
Now that we’ve pulled from our configuration, let’s not store that super-secret password as plain text in our secrets.json.
Setting Up Key Vault
To start, go ahead and create a new KeyVault in Azure, add a new secret called AdminAccount--Password, and put the admin password in that secret.
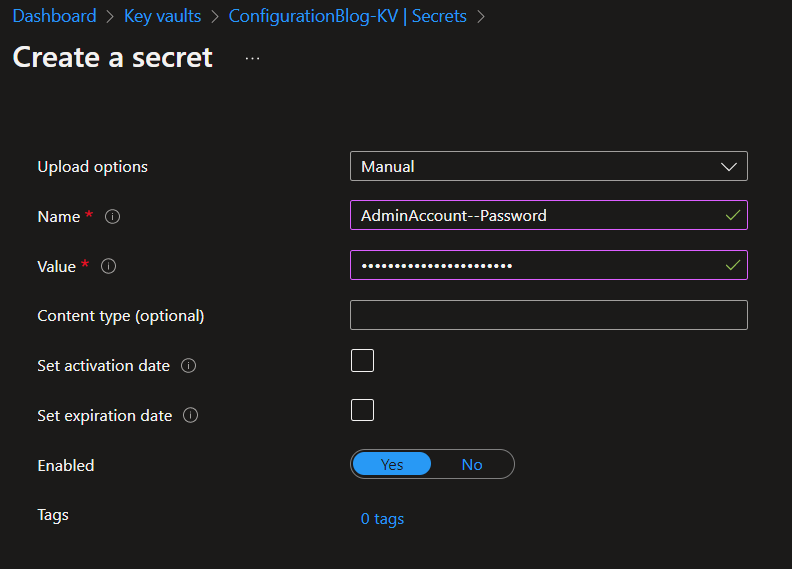
If the double-dashes syntax, --, is new to you, check out this Microsoft Documentation for some context.
Head back over to your application and open the appsettings.json file. Add a setting for storing your Key Vault URI. Your appsettings.json should now look something like this:
"KeyVaultUri": "https://configurationblog-kv.vault.azure.net/",
"AdminAccount": {
"Email": "ExampleAdmin@IntelliTect.com",
"FirstName": "IntelliTect",
"LastName": "Admin",
"Birthday": "01/01/1990"
  }
Code language: JavaScript (javascript)
Remove the password from your secrets.json because we are going to pull it directly from Key Vault instead. Your secrets.json file should now be empty.
Connecting Key Vault to Your App
Install the NuGet packages Azure.Extensions.AspNetCore.Configuration.Secrets and Azure.Identity on your project. Then add the following code snippet above where you are configuring your AdminAccountOptions service:
builder.Configuration
    .AddAzureKeyVault(
        // Provide the URI to your KeyVault...
        // Authenticating against it will be handeled via AAD permissions.
        new Uri(builder.Configuration.GetSection("KeyVaultUri").Value),
        // The below credential configuration is entirely up to you.
        // You may want to leave this configuration a bit more sparse
        // if you intend to allow developers to use their perfered
        // method of authenticating against Azure. However, for this
        // blog, i'll be showing you how to connect via the CLI so
        // I am disabling things that may override the CLI credentials.
        new DefaultAzureCredential(new DefaultAzureCredentialOptions()
        {
            ExcludeVisualStudioCredential = true,
            ExcludeInteractiveBrowserCredential = true,
            ExcludeSharedTokenCacheCredential = true,
            ExcludeEnvironmentCredential = true,
            ExcludeVisualStudioCodeCredential = true,
            ExcludeAzurePowerShellCredential = true
        }),
        new AzureKeyVaultConfigurationOptions()
        {
            // Optional configuration to reload the configuration every 10 minutes.
            // More on this below in the pros and cons section of the blog.
            ReloadInterval = TimeSpan.FromMinutes(10)
        });
Code language: PHP (php)
Now, all that’s left to do is connect to Azure via the Azure CLI and fire up the app. If you aren’t authenticated against the subscription your Key Vault is in and you try starting the application, an Azure.RequestFailed.Exception appears.
Note: You don’t have to use the Azure CLI to authenticate against Key Vault. Read more about the https://docs.microsoft.com/dotnet/api/azure.identity.defaultazurecredentialoptions?view=azure-dotnet to see alternative options.
Authenticating to Key Vault on Your Local Machine Via Azure CLI
To start, you’ll need the Azure CLI. Once installed, perform the following commands:
az login
A browser window should appear, prompting you to log in. Once done, you should see a list of subscriptions printed to the console. Set your subscription to the subscription your Key Vault is under with the following command:
az account set --subscription [YourSubscriptionId]
Once done, you should be able to fire up the app. If you receive an Azure.RequestFailedException, double-check that you’ve connected to the correct tenant and subscription. Review the DefaultAzureCredentialOptions above to ensure you aren’t excluding the AzureCliCredential or something isn’t overriding it.
All done! You’ve successfully set up your configuration to include Key Vault values.
Pros and Cons of Key Vault as a Configuration Provider
Pros of Key Vault
Low Barrier Set-up
The time and effort to add Key Vault as a configuration provider is a easy task. You can have a secure project up and running in no time. Besides, retrieving keys as if they are configuration values simplifies processes and makes using the IOptions pattern a breeze.
Improved Security
Key Vault ensures that keys are kept in a secure location and prevents accidental commits of sensitive information to a repo or leaked keys when devs share set-up information in a readme or over email chains. No longer are you storing sensitive information in plain text, environment variables, or hoping you’ve .gitignored all your sensitive files.
Additionally, setting up a new developer on a project using Key Vault as a config provider is as simple as giving them access to the development environment’s vault.
Centralized Management
It’s more than likely that you are using Key Vault for your production-level environments. So, it only makes sense that you would want your development environments to access configuration and key information similarly.
Cons of Key Vault
Transaction Limits
Key Vault has transaction limits that can become problematic for large-scaled applications. The transaction limit is typically not going to be an issue. However, it is crucial to remember that your app may not be the only thing grabbing information from Key Vault at any given time. It is best practice to keep different resources for your different environments, so consider a different Key Vault for development, QA, production, etc.
If you do experience throttling due to transaction limits, this Microsoft documentation may be of some help.
If you have lots and lots of keys in Key Vault, you may notice a reduction in performance as your application pulls all those values at once when it first loads up the configuration. It also refreshes all those values simultaneously if you’ve specified the configuration to refresh every "n" minutes.
Caching and Stale Keys
As I mentioned, your configuration gets loaded and cached into your application at startup. Unless you have specified that configuration to refresh, it remains cached until the application restarts. Additionally, you cannot refresh individual keys from the Vault without writing some custom implementations. If you determine you need to refresh a key, you need to reload all the configuration values and your Key Vault values.
Secrets Now Look Like Configuration Values
A dangerous aspect of using Key Vault as a configuration provider is something I listed as a pro. While Key Vault makes for easy development to treat keys and configuration values the same in your app, it can also introduce the possibility of terrible mistakes.
For example, let’s say you have a value stored in Key Vault called ApiCode, which holds an API key despite its awful naming. It’s very easy to expose this in some places accidentally. It’s not immediately evident that this is sensitive information, as it’s been abstracted away from any indication that it’s a value from Key Vault. This issue can still happen if you have a better name for your value, such as something explicit like ApiKey. So, it’s essential to be mindful of the data you may expose when using this pattern.
The App Throws if a User Isn’t Added to the RBAC Permissions in Key Vault
If someone or something without Key Vault access tries to start up your application, the whole thing crashes and burns—and the reason might not be apparent. The exception they are likely going to face is Azure.RequestFailedException, which doesn’t provide a great explanation as to what went wrong. While this is a con, it’s an easy one to fix. A solution would be to catch the exception and throw a new one with a better description of what may be happening. Check out this repo from one of our senior developers, Kevin, for an example of handling this error.
Wrapping Up
While adding Key Vault as a configuration provider may not be the right choice for every project, it currently covers most cases. The pros of configuring your application in this manner improve the development experience in terms of initial set-up and working between different environments. This method also significantly reduces the risk of exposing sensitive information compared to other methods, especially regarding the local development of applications.
The pattern also works quite nicely with the Options pattern, which helps to promote the principles of encapsulation and reduce tight coupling and unnecessary dependencies throughout your application.
Want More?
Check out these related blogs on all things Azure:
Azure SQL Database: Passwordless authenticate
Demystifying Coding Guidelines: Intro to Coding Conventions
Authenticate Without Code Using AAD and Azure App Services

Does Your Organization Need a Custom Solution?
Let’s chat about how we can help you achieve excellence on your next project!